Showing posts with label springerle. Show all posts

Monday, September 29, 2008

Springerle season kick-off, 2008.

Yep, I'm at it again. With the turn of the seasons comes a desire to try and, again, perfect my springerle skillz and break-in my new mold, with visible success!


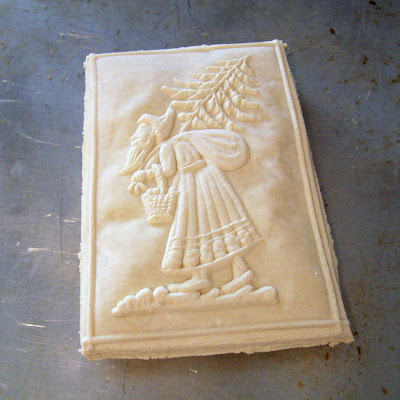
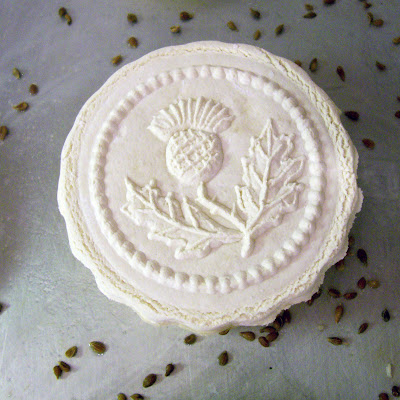
Those who were following my trials and tribulations last year, will remember my ongoing issue with big hollows forming in the cookies (pillowing, as I've dubbed it), and that I had to make some adjustments to the recipe. I think those adjustments have worked well, and I made another change by using extra large eggs, rather than just large eggs. I think the added moisture went a long way to help the dough stay "coherent," you might say. No large voids, no pillows, just a consistent cookie. And look, they grew perfect feet!


Now, the hardest part of all, allowing the springerle to ripen for a week before eating any more of them! ^_^;

Here's the recipe I've been using, along with my alterations...

Whole Egg Springerle
from cookiemolds.com
originally published by Sharon Hudgins
"Edible Art," The World and I Magazine, Dec. 2001


4 extra large eggs, at room temperature
1/2 tsp anise extract
4 cups confectioners' sugar*
grated zest of 1 lemon
4 cups all purpose flour*
3/4 tsp. baking powder
Optional: 2 Tbsp. whole anise seed

* First sift, then measure by spooning gently into a measuring cup and
leveling off the top with a knife.

Beat eggs in a large bowl with an electric mixer on high speed for 10 minutes, until they are very pale and thick. Reduce mixer speed to medium; add anise oil. Gradually add confectioners' sugar, 2 tablespoons at a time, beating continuously. After all the sugar has been added, beat on high speed for 10 minutes longer. Stir in grated lemon zest.

Sift flour and baking powder together into another bowl. Gradually stir into egg mixture, 1/2 cup at a time, mixing with a large wooden spoon until dough is smooth. Transfer dough to a floured pastry board and knead by hand for 5 minutes, until dough is soft and smooth and doesn't stick to your hands. Wrap dough securely in Plastic wrap and refrigerate for 2 to 3 hours.

Lightly butter (or spray with PAM) two large cookie sheets (not the air insulated variety). Optional:Put anise seed into a small plastic bag and crush them lightly with a rolling pin. Sprinkle crushed anise seed evenly over the cookie sheets.

Lightly dust a pastry board with flour or confectioners' sugar. Break off one-fourth of the chilled dough, leaving the remainder tightly wrapped in plastic (at room temperature if you are working quickly, or return to refrigerator if you not). Working quickly, because it dries rapidly, roll out dough with a standard rolling pin to a thickness of 1/4 inch. Dust top of dough lightly with confectioners' sugar, flour, or cornstarch.

Dust the mold to be used with confectioners' sugar and shake off excess. If using flat Springerle boards, press them firmly into the dough, to stamp the designs on the dough. If using a Springerle rolling pin, roll it only once firmly across the sheet of dough. With a fluted pastry cutter, pizza cutter, or sharp knife, cut the imprinted dough into individual cookies, each with a separate design in the middle. (If you plan to use the cookies as ornaments, punch a hole in the top of each with a skewer or matchstick. After baking, put a ribbon or piece of yarn through the hole to hang cookies on the tree.)

Use a spatula to transfer Springerle cookies to the baking sheets, placing cookies 1/2 inch apart Roll, stamp, and cut the remaining dough, re-rolling any scraps, until all the dough has been used. Let unbaked cookies sit in the open air, uncovered, in a warm room (away from children and pets) for 12 to 24 hours to dry thoroughly.

Preheat oven to 275ºF. Bake cookies on the middle rack of the oven, one baking sheet at a time, for 20 to 25 minutes. Watch carefully; don't let them over bake. They should be white on the top and pale golden on the bottom. Immediately remove the cookies from the baking sheets and transfer them to wire racks to cool for at least 1 hour. Brush remaining anise seed (if used) into an airtight container to use for storing Springerle.

When they have cooled completely, put them into the container with half an apple or a slice of bread set on top of the cookies, to make the Springerle soften while their flavor is developing. Cover container tightly. Leave cookies in container for at least 1 week (and up to 4 weeks), changing the apple or bread every few days to prevent mold from growing.

After their flavor has been allowed to ripen, Springerle can be eaten or stored for longer periods in the freezer. Stack them in a plastic freezer container, with a piece of wax paper between each
layer of cookies. Serve Springerle with coffee, tea, or a glass of chilled, not-too-dry, Alsatian, Rhine, or Mosel white wine. Makes approximately 60 two-inch-square Springerle cookies. (yield will vary, depending on size of cookie molds used.)

Note: Springerle cookies can be left totally white, or the designs on them can be painted with edible coloring materials.


Monday, September 22, 2008

New springerle mold.

Readers who were following me last year know well of my struggles with trying to bake the perfect springerle, which yielded mixed results. This year, I intend to keep working on my springerle, and even ordered a second mold from Mr. Gene Wilson.

This time 'round I purchased a smaller mold (2.5" x 3.5") featuring a proud/prancing reindeer/stag. It's Christmassy, to be sure, but I can also see using it for a sort of St. Patrick's cookie, as in the White Stag of Celtic legend.


I'll keep you posted about my baking results. I think it's about time I got to practicing my springerle!


Monday, October 22, 2007

The Third Battle of Springerle

The Sun rises from over the Wasatch Mountains. A lone baker stands in his kitchen, sipping a cup of assam tea. A low heat emanates from the oven behind him. Pacing back and forth, like a general about to lead his Six Hundred into the Valley of Death, he gives a final inspection to the 21 raw springerle cookies that are lined up like soldiers on two steel sheet pans. The Baker turns on his heel, opens the oven door, and places the first of the two pans into the oven. The Third Battle of the Springerle has begun.

The Baker, having closed the oven door, thinks back on his previous engagements with The Springerle. A veteran of two previous battles, he is tired of being beaten, and feels that victory is in reach. He remembers the First Battle. Though the cookies tasted good, the detail of the image pressed into the dough was poor, and all the cookies ended up having large voids or pockets just beneath the surface, and the springerle failed to grow their traditional "feet." The Second Battle ended again with the Baker in retreat. He had decided to reduce the amount of baking powder from one teaspoon, to 3/4 teaspoon. Still, despite this adjustment, the void persisted, though the "feet" almost grew; he could see that the bottoms of the cookies had risen, but not enough to be "feet." So the Baker, defeated a second time, went to consult with his advisers.

First, he went to the creator of the molds he had used to press the springerle, Mr. Gene Wilson. Mr. Wilson advised reducing the temperature of the oven a bit. He also mentioned the effects of humidity and altitude while baking springerle. The Baker agreed, having dealt with the challenge of high-altitude baking many times before. The Baker then consulted his baking allies at The Springerle House. They too agreed that he should reduce the temperature of his oven from 300º F to 250º or 275º F. They also advised that he extend the baking time from 15 minutes to 20 or even 25 minutes.

As for the lack of detail, the Baker decided to allow the rolled dough to first warm up a bit, then having placed the mold, he jumped up on the table and knelled on the mold. (Understand, the Baker is not a big guy, so it takes do effort to press the cookie.)

The Baker applied these insights and techniques on this morning, as he waited for the first tray to finish baking.

Five minutes passed...then ten minutes...then fifteen. He peeked in the oven to see what had become of his springerle. What he saw astounded him, the springerle were floating. He closed the door, while joy and anticipation welled within him. Finally, twenty minutes had passed. He once again open the oven door and pulled out the sheet pan. Here is what awaited his gaze...


good, sharp detail, and...


the Weinachtsmann, standing up on his foot. Yes! The springerle had doubled in thickness, not by puffing up, but by growing a foot.

Encouraged by this new success, he placed the second sheet pan, this one holding cookies made with his new thistle mold, into the oven. Twenty minutes at 275º F later, again, success!


Sharp detail and a fluted edge (thanks to a linzer cookie cutter he didn't even know he had), and...


strong, well formed feet on all of the cookies.

Finally victorious after three attempts, the Baker now begins the hardest part of making springerle...letting them sit to ripen for a week before really digging in.

Monday, September 17, 2007

Pre-holidays Springerle Test Run.

(Yes, I know, it's still too early for Christmasy stuff, but I wanted to give my new toy a spin.)

About this time last year, I became very interested in the art of springerle and other Old World Christmas cookies. At the time, however, I was unable to get any springerle molds and set my sights on the lebkuchen legacy (a blog to look for in coming months), and set aside my springerle dreams...until now.

I happened across the work Mr. Gene Wilson of Belleville, Illinois and his website, Hobi Cookie Molds. I looked about and almost immediately ordered my first hand carved springerle mold.


The molds features Weinachtsmann, one of what appear to be numerous variations of Santa in Germany. The mold is from Gene's Heirloom Springerle Collection, it measures three inches wide and five inches tall, and is 3/8 inch thick. The price was about even with most resin reproduction molds I've seen, at $26.

I am very impressed with the detail in the mold. The folds in Weinachtsmann's robe, the texture of the basket, the tree branches, even the three bags of coins...it's all there. But a mold is just a piece of kitchen decoration until one puts it to its intended use. So, I did.

The process of making springerle is pretty involved and requires a bit of planning. First, you have to let the dough rest and chill for two to three hours after mixing it. Second, after you do mold the cookies and cut them out, you have to let them dry on the counter for 12 to 24 hours. You then bake them "in a slow oven," which translates as 300º F, for 12 - 15 minutes. If that wasn't enough, after you cool them you need to let them "ripen" for a week (some recipes call for three weeks) in a container with a slice of bread. This lets you slowly reintroduce moisture into the cookies. Then you may enjoy.

I decided that I would use the included springerle recipe for my first try, and I'm fairly happy with the results.


They lack some of the finer details from the mold, but I guess you can't expect your first batch of springerle to be a blue ribbon entry. As you can see, they're quite puffy, which is a result I didn't see coming. Especially considering how flat and dense the dough was. When I broke one open (I couldn't help myself), the inside was almost cracker-like, with layers of air and cookie. Are they supposed to be like that?

I'll give them another try in a week or two, after my first batch ripens.

I'm already looking at the next molds I want to order from Mr. Wilson. This time I'm thinking...shortbread.

Sláinte!