Showing posts with label bread. Show all posts

Tuesday, February 24, 2009

Chocolate + Cardamom + Bread = T3h Awesome!

Work and life in general have both conspired to keep me too busy to do much in the way of baking or blogging, as of late. Thus, when I had two days off in a row (something of a rarity for me) I decided to take advantage of it and get off my lazy ass and bake something!

I don't know why, but the thought of a chocolate bread popped into my mind pretty quickly. I did not, however, want to end up baking what amounted to a chocolate loaf cake...I wanted bread, the kind with yeast you get to knead in a Tai Chi-like motion, thus gaining peace and mental centrality. (I think I just made up that last bit, but it sounds good so I'm rolling with it!) I hunted about for recipes and finally found one that fit the bill!


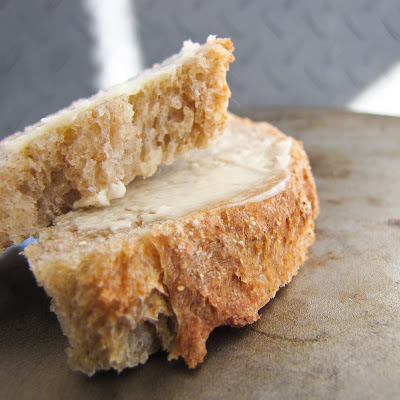
The bread come out looking like a loaf of whole wheat bread, even though it's all just unbleached AP flour--ah, the wonders of unsweetened cocoa powder. The chocolate flavor isn't apparent at first, but it sinks in as you chew. I took a little liberty with the recipe and added in a couple of pods worth of fresh ground cardamom seed (my favorite spice), which gave it that little something of curiosity. The white you see on top of the loaf is just more flour, though I did consider powdered sugar, but wanting to keep with a non-sweet chocolate bread, I opted instead for flour.

All and all I do like the bread, and it makes for a killer peanut butter and jelly sandwich!

Chocolate Cardamom Bread
via About.com and tweaked just slightly by moi.


4 cups Unbleached AP Flour, approx.
¼ cup Unsweetened Cocoa Powder
2 tbsp Sugar
1 tbsp Brown Sugar
2 ¼ tsp (or one packet) Active Dry Yeast
1 tsp Salt
1 tbsp Vegetable Oil
1 ½ cups Warm Water (about 110°F)

In large bow, mix together 2 cups bread flour, cocoa, sugar, brown sugar, yeast, salt, oil, and water. Mix in the remaining flour, about a quarter cup at a time, until a soft dough forms. Turn dough out onto lightly floured board and knead for 5 minutes, adding only a small sprinkle of flour each time the dough gets too sticky.

Put dough in greased bowl. Turn dough over in bowl so that the dough top is also lightly greased. Cover bowl with plastic wrap or clean kitchen cloth and let rise in warm place for 1 hour.

Punch down dough. Turn dough out onto board and knead for another 5 minutes. Shape dough into loaf. Put loaf in greased 9x5-inch loaf pan. Cover loaf and let rise for about 30 minutes or until double in size.

Bake at 400°F for about 25 minutes or until bread sounds hollow when you tap on it.

Sunday, January 18, 2009

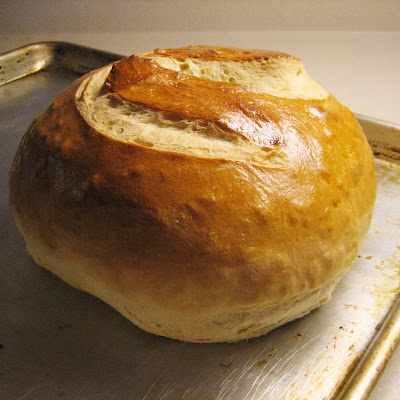
The five minute artisan bread that took a week to make.

It's been a couple of years since Mark Bittman and the New York Times published their first articles on various no-knead breads, which have since popped up on sites like Tastespotting and many a food blog.

And now it's my turn! Hey, it had to happen at some point I suppose.

No-knead bread is something I've actually avoided ever since I first read about it one morning in the photo lab, on campus, a couple of years ago. Personally, if I want fresh bread, I want it today...not tomorrow. Then, a couple of weeks ago, while listening to The Splendid Table, I listened intently as Lynne spoke with Zoe Francois and Jeff Hertzberg, authors of Artisan Bread in Five Minutes a Day: The Discovery that Revolutionizes Home Baking. At first I thought their method was just another clone of the many recipes for no-knead bread which are mostly the same. The difference, and the step that really caught my attention, is that with this recipe, you actually want to let it age or ripen in the fridge for as long as two weeks. Now that had to make an interesting loaf!


Another point I like about this bread is that ou needn't bake it all at once. I have actually been using small handfulls at a time to make even a single roll, or rolling out a little bit and making flatbread on the grill, so this is a batch that you can come back to all week long. At least, that's how long I've been aging my dough! And the longer you age it, the more intense and flavorful it becomes. After a week it has an almost sourdough-like flavor to it.

This, being my first attempt, I didn't mess with the recipe much, with the exception of replacing three cups of all purpose flour with whole wheat, just to give it a bit more flavor and a more old worldliness, I suppose you could say. Next time, which will be very soon, maybe even tomorrow, I may try using bread flour cut with rye flour, or maybe barley flour.

Five-Minute Artisan Bread
From Artisan Bread in Five Minutes a Day: The Discovery that Revolutionizes Home Baking by Jeff Hertzberg and Zoe Francois (Thomas Dunne Books, 2007). Copyright 2007 by Jeff Hertzberg and Zoe Francois.


Serves 4

Note: This recipe must be prepared in advance.

1-1/2 tablespoons granulated yeast (about 1-1/2 packets)
1-1/2 tablespoons kosher salt
6-1/2 cups unbleached flour, plus extra for dusting dough
Cornmeal

In a large plastic resealable container, mix yeast and salt into 3 cups lukewarm (about 100 degrees) water. Using a large spoon, stir in flour, mixing until mixture is uniformly moist with no dry patches. Do not knead. Dough will be wet and loose enough to conform to shape of plastic container. Cover, but not with an airtight lid.

Let dough rise at room temperature, until dough begins to flatten on top or collapse, at least 2 hours and up to 5 hours. (At this point, dough can be refrigerated up to 2 weeks; refrigerated dough is easier to work with than room-temperature dough, so the authors recommend that first-time bakers refrigerate dough overnight or at least 3 hours.)

When ready to bake, sprinkle cornmeal on a pizza peel. Place a broiler pan on bottom rack of oven. Place baking stone on middle rack and preheat oven to 450 degrees, preheating baking stone for at least 20 minutes.

Sprinkle a little flour on dough and on your hands. Pull dough up and, using a serrated knife, cut off a grapefruit-size piece (about 1 pound). Working for 30 to 60 seconds (and adding flour as needed to prevent dough from sticking to hands; most dusting flour will fall off, it's not intended to be incorporated into dough), turn dough in hands, gently stretching surface of dough, rotating ball a quarter-turn as you go, creating a rounded top and a bunched bottom.

Place shaped dough on prepared pizza peel and let rest, uncovered, for 40 minutes. Repeat with remaining dough or refrigerate it in lidded container. (Even one day's storage improves flavor and texture of bread. Dough can also be frozen in 1-pound portions in airtight containers and defrosted overnight in refrigerator prior to baking day.) Dust dough with flour.

Using a serrated knife, slash top of dough in three parallel, 1/4-inch deep cuts (or in a tic-tac-toe pattern). Slide dough onto preheated baking stone. Pour 1 cup hot tap water into broiler pan and quickly close oven door to trap steam. Bake until crust is well-browned and firm to the touch, about 30 minutes. Remove from oven to a wire rack and cool completely.


Thursday, January 10, 2008

Delicious Simplicity

After the month-and-a-half of ornate, intricate, rich baking and cooking, I decided that today I needed something different, something simple, basic.

White bread. Yeah, that's the ticket.

I had seen a posting via Tastespotting, from Jennie at Straight from the Farm and decided to take a crack at it.


It's fluffy, light, and fall of flavor, which is a challenge sometimes with white bread. It is indeed Miracle Bread.

MIRACLE BREAD

Part I
2 c. boiling water
2 T. butter
2 T. sugar
2 t. salt

Combine above ingredients and cool to lukewarm.

Part II
1/2 c. hot (but not boiling) water
2 packages of rapid rise dry yeast (2T.)
1 T. (scant) sugar

Whisk together Part II ingredients in a medium bowl and cover with a towel. Let yeast rise for 15-20 minutes, being sure it froths up and expands considerably. If yeast doesn’t rise, toss it and get new yeast before proceeding.

Once yeast has risen, combine with Part I. Add 6 to 6 1/2 cups of flour*, mixing with a spoon at first and then using your hands as it comes together. Add just enough flour to keep dough from being sticky. Knead dough for a few times and then cover bowl with a towel to let it rise. Come back to it every 10 minutes to punch it down and knead it some more, repeating this process 4-5 times. Don’t worry if you leave it longer - just be sure to punch it down a few times before proceeding with baking.

Divide dough in half at least once as it makes two large loaves. You can also divide it more times if you want to make smaller loaves or rolls. Place loaves on a greased baking sheet or in greased loaf pans. Cover again with a towel and let dough rise to double the size. If you want, you can use a sharp knife to make cuts in the dough to create ridges when they’re baked. I used an X shape this time on my round loaves for a nice artisan look.

Preheat oven to 375 F and bake risen loaves for 20 minutes or until lightly browned. Take loaves from the oven and brush with melted butter or spray with cooking spray to give loaves a nice sheen.

*The flour can be all unbleached white flour or a mixture of whole wheat and white flour. Use at least 3 cups of white flour or else the dough won’t be as forgiving.


Paix et santé!

Thursday, July 26, 2007

Ad Hoc Grilled Flat Bread

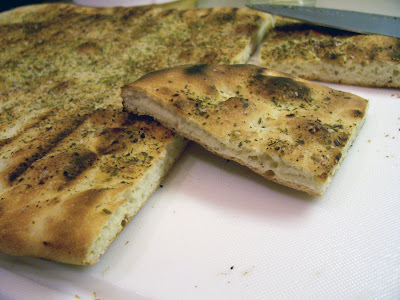
I didn't wake up this morning with the intention of posting an entry, it just happened. Being my day off, I decided that I just had to bake something, but I didn't want to be at it all day. After ruminating on the thought a while, I remembered my previous experiments with Giada De Laurentiis' pizza dough recipe from March's Bon Appétit. It was easy, simple, and delicious, as good pizza dough should be.

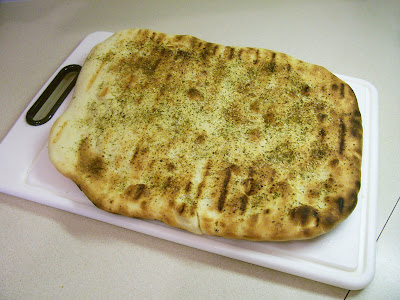
I followed the recipe as I had previously; yeast, flour, sugar, salt, knead, rise, punch, and roll...you know the drill. However, because of the hot weather, I didn't really want to heat up the kitchen with a 450°F oven, so I looked, as many of us do in the Summer, to the grill. I just set the burners to a medium heat and let it warm up. Going back to the dough, I brushed it with some extra virgin olive oil ans sprinkled it with some Asian seasoning blend, sesame seeds, kosher salt, and fresh ground black pepper. I threw it onto the grill until the bottom was brown and had nice grill marks, then flipped it over and let it go until done.

The results...


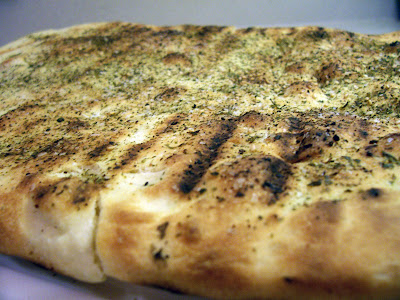
( ^ That's my favorite picture ^ )


Right off the grill, the crust is hard and crunchy while the inside is soft and fluffy...in a word, perfect! And those charred bits, the bets part, if you ask me.

Just cut it up and dip into some duck sauce and you got a nice appetizer or snack.

Grilled Flat Bread
3/4 cup warm water (105°F to 115°F)
1 envelope active dry yeast
2 cups (or more) all purpose flour
1 teaspoon sugar
3/4 teaspoon salt
3 tablespoons olive oil

Pour 3/4 cup warm water into small bowl; stir in yeast. Let stand until yeast dissolves, about 5 minutes.

Brush large bowl lightly with olive oil. Mix 2 cups flour, sugar, and salt in processor. Add yeast mixture and 3 tablespoons oil; process until dough forms a sticky ball. Transfer to lightly floured surface. Knead dough until smooth, adding more flour by tablespoonfuls if dough is very sticky, about 1 minute. Transfer to prepared bowl; turn dough in bowl to coat with oil. Cover bowl with plastic wrap and let dough rise in warm draft-free area until doubled in volume, about 1 hour. Punch down dough. Roll out dough into desired shape (mine was rectangular) and brush with extra virgin olive oil and sprinkle with Asian seasoning (I had some Emeril's Asian Essence on hand), kosher salt, sesame seeds, and coarsely ground black pepper, all to taste.

Set grill to medium-ish heat and all it warm up, about 10 minutes. Transfer dough to grill, close top, and grill until the bottom is golden brown and delicious. Flip bread over and repeat on other side, until it looks done to you.