Tuesday, June 23, 2009

Tofooled You! Vanilla "Cream" Pie for Father's Day

After a week of fun and relaxin' at Lake Powell, I return to the cadence of the everyday. O' that I were able to run away again! That doesn't sound like a bad idea, really...hm.

But I digress...

We returned from Lake Powell late Saturday, and I luckily had Sunday off from work, which allowed me to turn my attention to Father's Day, and what to make. I wanted something a bit on the light side, considering the week-long snacking fest on the houseboat. I thought about a cream pie, but wanted to lighten it up a bit. I then remembered (with a laugh) a few years back, fooling everyone at an Independence Day barbecue, by serving a chocolate cream pie that was no usual cream pie, in that it contained no cream...but instead used a base of tofu. ^_^ So I went back to that recipe (Alton Brown's Moo-Less Chocolate Pie), and did some modification to use what I had on hand. (I was still recovering from the long drive and unpacking and cleaning that accompanies one's return from vacation.)

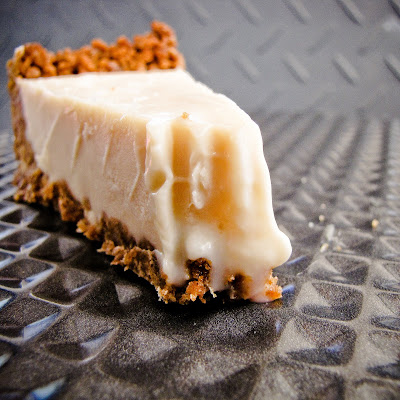
I thus give you the Vanilla "Cream" Pie with a Gingersnap Crust!


As is, it makes a light, sweet treat for warm weather, though I think that next time I make it, I'll probably add some cardamom to the filling. I think it would accent the gingersnap crust perfectly! This recipe is also a good starting point for further modification. How does a mint cream pie with chocolate crust sound?

Vanilla "Cream" Pie with Gingersnap Crust

For Crust
1 2/3 cups Gingersnaps, finely ground
1/4 cup Butter, melted
1/4 cup Sugar

Combine all ingredients in a bowl, then press into a 9-inch pie pan.

Bake at 350° F for 10 minutes. Set aside to cool.

For Vanilla "Cream" Filling
2 cups Vanilla (White Chocolate) Chips
1/3 cup Milk
1 block Silken Tofu (I used Mori-Nu)
1 tsp. Vanilla Extract
2 tbsp. Honey

Using a double boiler, melt the vanilla chips and milk, stirring until smooth. Add vanilla and honey.

In a blender, combine the tofu and white chocolate mixture. Liquefy until smooth.

Pour filling into the gingersnap crust. Chill in the fridge until cooled and filling begins to set, then transfer to the freezer until the pie is set solid. This not only makes the pie all the more refreshing to east, but it also makes it much easier to cut and serve.

Wednesday, June 10, 2009

Galactic Cookies and Crappy Photoshopping...YAY!

Just a quick post today and a really crappy Photoshop of one of the Galactic Spiral Shortbread Cookies I baked a few days ago. (Cut me some slack, I'm pressed for time this week, what with vacation prep and all!)


I've seen photos of these kinds of swirl cookies floating about Tastespotting and other food blogs and decided to add my own spin to them when I noticed their galactic nature. I settled on a recipe I found on FoodNetwork.com, but decided to top them with those chocolate buttons that are covered with those candy dots. I think the buttons add an accent of sweetness to an otherwise not-so-sweet cookie.

They are mighty tasty, though, if not a bit labour intensive. Give them a go if you're looking for a cookie with some visual punch for your next cookie swap!

Galactic Swirl Cookies
via FoodNetwork.com
modified by Tom


Vanilla Dough:

1/2 cup granulated sugar
2 tablespoons confectioners' sugar
1/4 teaspoon fine salt
1 large egg
1 to 1 1/4 teaspoons vanilla extract
1 cup unsalted butter, (2 sticks), room temperature
2 cups all-purpose flour

Chocolate Dough:

1 1/4 cups granulated sugar
3/4 cup natural cocoa powder
1/4 teaspoon fine salt
1 cup unsalted butter, (2 sticks) room temperature
1 large egg
1 1/2 cups all-purpose flour

About six dozen chocolate buttons

Directions

For the vanilla dough: Mix the 2 sugars and the salt together in a medium bowl. In another small bowl, whisk the egg and mint extract and set aside. With a hand held mixer beat the butter until smooth in a large bowl. While mixing, gradually add the sugar mixture, and continue beating until lightly colored and fluffy, about 1 to 2 minutes. Stop mixing and scrape down the sides of the bowl. Add the egg mixture and beat until smooth. Gradually add the flour, mixing slowly until blended.

Turn the dough out of the bowl, divide in half. Place the halves between 2 pieces of lightly floured parchment or waxed paper. Roll into a 10 by 12 by 1/4 inch rectangle. Slide the sheets of dough/parchment sheets onto a baking sheet, and refrigerate until firm, about 2 hours or overnight.

For the chocolate dough: Whisk the sugar, cocoa, salt in a medium bowl. With a hand held mixer beat the butter until smooth in a large bowl. While mixing, add the cocoa mixture, and continue beating until lightly colored and fluffy, 1 to 2 minutes. Stop mixing and scrape down the sides of the bowl. Add the egg and beat until smooth. Gradually add the flour, mixing slowly until blended.

Turn the dough out of the bowl, divide in half. Place the halves between 2 pieces of lightly floured parchment or waxed paper. Roll into a 10 by 12 by 1/4 inch rectangle. Slide the sheets of dough/parchment sheets onto a baking sheet, and refrigerate until firm, about 2 hours or overnight.

For a spiral cookie: Put 1 of the chocolate doughs on the workspace and remove the top sheet of parchment. Brush dough lightly with cold water. Place a sheet of vanilla dough on the workspace, and remove top sheet of paper. Using the bottom piece of the paper to lift the dough, place the vanilla dough on top of the chocolate dough. Take care to line up the edges of the 2 doughs and trim as needed. Lightly press to smooth and seal the doughs together. Remove the top piece of paper. Brush the surface of the dough lightly with cold water. Position the sandwiched doughs with the long edge facing you. Using the edge of the paper as a guide, roll the doughs into a tight cylinder, 2 inches wide. Wrap in plastic and refrigerate for 1 hour. Repeat with remaining 2 sheets of dough.

Evenly position racks in the oven, and preheat to 325 degrees F.

Slice the dough crosswise into 1/4-inch thick cookies. Lay about 1/2-inch apart on parchment-lined baking sheets. Bake until just golden - not too dark you'll lose the definition of the spiral, about 14 to 16 minutes. After removing from oven, place one chocolate button in the center of each cookie. Allow cookies to cool until chocolate re-solidifies. I put mine in the fridge to expidite this process.

Wednesday, June 3, 2009

Strawberry Kiwi Oatmeal: Simple, Seasonal, and Slow

Whew, it's been a while, hasn't it? Why have I not posted any new entries? Where I been? What have I been doing? Well, nowhere and not much; I just haven't been super inspired lately, nor have I really cooked anything of much interest (I'm not one to blog about every darn thing I eat, y'know). Excuses aside, I come to you this morning to break my blog fasting and to present you with a bowl of strawberry kiwi oatmeal.


I have had this love of oats for the past few years now, and I never seem to grow tired of them, especially Irish oats (a.k.a. pin-head oats or steel-cut oats). Sure, they take twenty minutes to cook, but they're well worth the effort. They're chewy and just more satisfying to eat than rolled oats. I don't really follow a recipe per se, when I make oats, I just go with the flow of what I have on hand. The only "recipe" is for the base oats...

1/4 cup Irish Oats
1 1/4 cups Hot Water
~ 1/4 cup Soy Milk, Buttermilk, and/or Plain Fat-Free Yogurt
Pinch of Salt

Throw the oats, salt, and water into a small sauce pan and boil on low until thick. Pour in your dairy, return to boil, simmer until thickened to your liking.

From here I add in whatever piques my palette. This morning I had strawberries and a kiwi on hand, so I took one big berry and diced it fine and did the same with half of the kiwi. These I added in about half way through the cooking process. Adding some of your ingredients while the oats boil allows them to cook into the oats and give you an overall background flavor. When the oats got to my desired creaminess, I sliced another strawberry and the other half of the kiwi and used them to top the oatmeal. I also took the liberty of adding a few drops of stevia extract to boost the sweetness factor, a bit.

Simple, seasonal, and slow.